 A Period Folding Chair
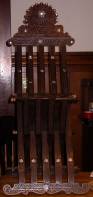
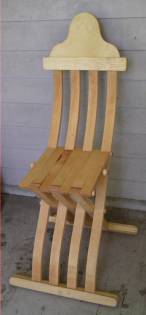
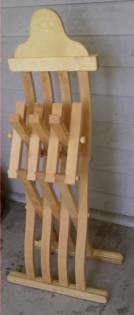
The pictures on the left show an antique Middle
Eastern chair, possibly 19th or early 20th
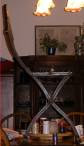
century Syrian. The one on the right is a similar design from the
fifteenth century. Both are examples of a kind of chair that is
moderately easy to make  and very
convenient for SCA purposes, since it folds almost perfectly flat.
and very
convenient for SCA purposes, since it folds almost perfectly flat.
The two differ in one significant detail. The chair on the left is symmetrical from the seat down--the short legs are identical to the lower part of the long legs. The chair on the right uses straight short legs, curved long. The latter is a little easier to make, I find it somewhat more attractive, and it is the one for which I have found period examples, so in this article I focus on it while also providing instructions for those who want to try the other version--which I suspect, but cannot yet prove, is also period.
Figure 1 is the side view on the left reduced to a line drawing. Figure 2 is a cutting diagram for the vertical pieces. Dimensions are based on the Syrian chair, which is the only one I have actually been able to measure. The seat is 19 1/2" above the ground, so to make your own chair first determine what seat height you find comfortable and then scale the figure accordingly.
 Construction
Figure 1
The chair on the left has five long verticals,
four short verticals, and nine short slats for the seat, the one on the
right
has six, five, and 11. How many you want for your chair depends on how
thick
the plank is that you are cutting your verticals out of, and how wide
you
want the chair to be.
Hardwood lumber often comes in 3/4" planks, misleadingly referred to as "one by É ." While it is possible to use that thickness for the chair, unless you are making it in a child's size you will end up needing a lot of pieces. The chair in Figure 1 is cut from 1 1/4" thick wood. That gives it a seat width of 9x1.25"=11.25", which is reasonably comfortable for most of us.
Once you have decided what kind of wood of what
thickness to use and bought it, the next step is to make a pattern.
Copy Figure 2--by the time you read this a version of this article
should be on my web page available for download--blow it up to whatever
size you require, modify
for the number of pieces you need, print it out. Paste it to the wood
using
a little flour-water paste, then saw out the pieces. This is easiest
using
a band saw, which is how I did mine. If you don't have a band saw you ca n use an electric jig
saw, if you don't have that, a hand jig saw--although that may take a
while. Drill the holes. Cut the slats for the seat out of the same
thickness wood you use for the verticals, using Figure 1 for shape and
size.
n use an electric jig
saw, if you don't have that, a hand jig saw--although that may take a
while. Drill the holes. Cut the slats for the seat out of the same
thickness wood you use for the verticals, using Figure 1 for shape and
size.
In my experience, the seat slats are the trickiest part of the whole operation. There are two slightly different kinds--one that pivots on a curved vertical and rests against a straight, one the other way around. When the chair is assembled, the central holes of the two are going to be superimposed, with one dowel running through both. That means that the sum of the distance between the two holes on slat A and the corresponding distance on slat B is going to be the horizontal distance between the hole in a curved vertical that A pivots on and the corresponding hole in a straight vertical that B pivots on. With that distance fixed, an error in the length of a slat or the position of hole of as little as an eighth of an inch results in either a slat that is too long and so keeps all the slats from lying flat or is too short and so leaves a noticeable gap.
The best solution I have found is to make one slat A and one slat B and fiddle with them until you have them exactly right--until you can assemble them with a straight vertical and a curved vertical and dowels through all the holes and have the two slat seat lie flat with no gaps. Then use them as patterns for the rest, making enough so that you have a slat A for every straight vertical and a slat B for every curved vertical. Then assemble the whole thing, trim anything that's a little too long, curse at whatever gaps show up, and replace any slats that, by some malevolent magic, turned out wrong.
You now have everything except the feet and the back. The feet are long rectangles with rounded corners as shown in Figure 3, cut from 1" thick wood. Use a saw to cut a 1/2"x1/2" groove along the top edge of each, for the tabs at the ends of verticals to fit into. Glue the tabs in and fill in the gaps in the groove with additional pieces of scrap wood cut to fit. Alternatively, drill holes for the tabs and use a chisel to square them.
The back attaches to the long vertical pieces using the piece labelled "Top Piece" in Figure 3. It is grooved along its bottom edge to take the tabs on the top ends of the verticals and along its top edge to take the edge of the back, which goes in as shown by the two arrows and is glued.
Assembly
Before gluing on
the back and feet you must first assemble the verticals and
the slats, as shown in the figures, using 3/8" hardwood dowels. I cap
the
dowels with wooden hemispheres bought from my local hardware store.
Alternatively, you can drill the end and put a much smaller dowel
through it crossways.
gluing on
the back and feet you must first assemble the verticals and
the slats, as shown in the figures, using 3/8" hardwood dowels. I cap
the
dowels with wooden hemispheres bought from my local hardware store.
Alternatively, you can drill the end and put a much smaller dowel
through it crossways.
Before gluing, use sandpaper or a file to round
the
outer edges of the two slats at the edge of the seat and the front edge
of
the seat so they won't cut into the legs of the person sitting in the
chair. Sand anything smooth that you want
smoother than
it is. If you are going to finish the chair with linseed oil, now is
the
time to do at least those parts that will be hard to get at once the
whole
thing is together. I usually disassemble, oil the pieces, avoiding
places that will have glue, then reassemble a day or two later when the
oil is
dry. When the chair i s reassembled you can
glue on the feet, the top piece, and the back. Fill in the parts of the
grooves that are empty with additional bits of wood cut to size. Oil
anything that didn't get oiled before. Wait a day or two.
s reassembled you can
glue on the feet, the top piece, and the back. Fill in the parts of the
grooves that are empty with additional bits of wood cut to size. Oil
anything that didn't get oiled before. Wait a day or two.
You now have a chair that will fold flat. For
proof, see below.
3
feet of 2x12
Folding
Folded
Variations
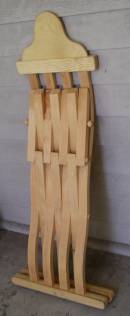
Most of my chairs were made of hardwood, with thicknesses ranging from 3/4" to 1 5/8", but I also made one, shown above, out of softwood. The verticals were cut from a three foot length of 2x12, which cost about ten dollars in number 2 pine. Using four long verticals, three short, and seven slats gave me a width of 7x1 3/4"=12 1/4". I used half inch pine plank for the back and cut the feet and the top piece out of a two by four. Total cost, including dowels, was under twenty dollars, and the chair came out very nicely. After pricing the materials at a Home Depot, I calculated that if I were making two chairs, I could get the materials cost to below ten dollars a chair.
I also did several in the style that has the short verticals as well as the long verticals curved. If you want to do one that way, you can still use Figure 2. The slanted lines on the long verticals which you were wondering about when you looked at the figure represent what would be the top of the piece if it were a short vertical--just above the hole for the dowel that the seat slats pivot on. So print out the figure twice to an appropriate scale and use one copy for cutting the short verticals. If you come across a reference to a period chair done that way, let me know--I'm still looking.
I have shown sizes on many of the figures, but don't take them too seriously--I have never gotten my hands on a period version of the chair to measure. Details in this article are a combination of details from the out of period antique I started with and details that I included because I did it that way and the result was satisfactory. Feel free to change anything you like and see how it comes out. I, for instance, replaced the iron rods in the antique chair with 3/8" dowels in the chairs I built.
Cariadoc