[This is an
article written in Word, saved as a web page, with layout somewhat scrambled as
a result; references in the text to the location of figures may therefor be
wrong, and labels are not always under the figure. Sorry about that; one of
these days I'll web it properly.]
To Make a Lyre
My initial source for information on how to make an Anglo-Saxon lyre was an article by Master Dofinn-Hallr Morrisson, webbed at http://www.cs.vassar.edu/~priestdo/lyre.html. I have also made some use of the chapter on the Sutton Hoo lyre in Aspects of anglo-saxon archaeology by Rupert Bruce-Mitford. My later lyres are based on the lyre excavated in Trossingen in 2002, the only complete instrument still known to exist. Several were based on the preliminary account of the excavation, but for the most recent I was able to use the much more detailed description published in Germania in December of 2006.[1]
In this article I describe three different designs for the Sutton Hoo style lyre, two loosely based on Dof's deliberately simplified instructions, the third an attempt to get substantially closer to the original. Dof is not responsible for any errors I have introduced. I then go on to describe how to build a Trossingen lyre.
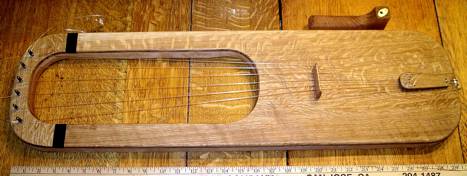
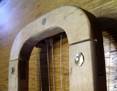
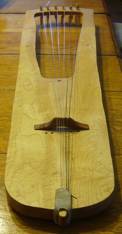
The picture above is a finished lyre constructed according to my second design. It is 30" long and 8 1/2" wide. The general pattern is common to all three designs--a rounded rectangle, with an offset rounded rectangular hole. The main body of the instrument is a hollow soundbox. Six strings run from a tailpiece[2] at one end, over a bridge resting on the soundbox, over the hand hole through which the instrument is played, to tuning pins at the other end of the instrument. If Dof's interpretation of the evidence is correct, the instrument is played by using one hand to strum all six strings while using the other to damp the strings you do not want to sound. Readers interested in further explanation should check his web site and other sites that discuss the lyre.
All three of the Sutton Hoo style lyres whose construction I describe are made of maple with an oak soundboard, although other hardwoods should work as well. The first design, which I have not made, is intended to produce a working instrument without requiring the use of a router or equivalent. The second and third designs assume that you have either a router or sufficient skill and patience with a chisel to substitute for a router. The other tools you will require are a saw capable of making curved cuts in 3/4" hardwood, including one interior cut (so a band saw by itself is not sufficient), some way of sanding the wood, and a drill. For the third design a table saw is useful but not essential. For convenience all three designs are given for instruments about the size of the Sutton-Hoo lyre; some of the lyres shown in the illustrations are, and some historic lyres were, substantially smaller.
First Design: The body
Materials:
maple plank 3/4"x30"x8", oak planks 1/4" x26"x8",
1/4" x30"x8", 1/4"x4"x8". In each case, the grain runs along the second
dimension shown (see figures). If you can't get 1/8" oak (I 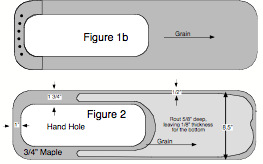
 bought
it at 1/4" and had the lumber store plane it down for me--alternatively,
it might be possible to use a saw to split a 3/4" thick plank into two pieces
each about 1/4" thick) use 1/4", or 1/8" hardwood plywood--in
which case the direction of the grain will not be an issue.
bought
it at 1/4" and had the lumber store plane it down for me--alternatively,
it might be possible to use a saw to split a 3/4" thick plank into two pieces
each about 1/4" thick) use 1/4", or 1/8" hardwood plywood--in
which case the direction of the grain will not be an issue.
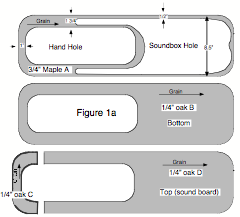
Figure 1a shows the cutting pattern for the pieces. Piece A is the maple plank that makes up most of the lyre, B the bottom of the instrument, C and D the top. Arrows show the direction of the grain. Glue piece B to the bottom of the maple, glue C and D to the top as shown on Figure 1b (ignore the six black circles for the moment). Let the glue dry. Then … (skip the next bit)
Second Design: The body
Materials: maple plank 3/4"x30"x8", oak planks 1/4" x26"x8", 1/4"x4"x8". Grain runs along the second dimension shown (see figures).
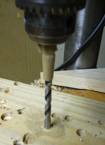
Cut oak pieces C and D as in the first design. Cut the maple as shown in Figure 2. Rout out the shaded region to a depth of 5/8"--in other words, until the remaining thickness of the bottom is only 1/8". You will probably want to initially leave a ridge unrouted along the center of what is going to be the sound box, in order to have something to support the side of the router while taking down the rest of the sound box--take the ridge down as a final step, using a piece of wood of the thickness you have routed out under the edge of the router to support it if necessary.
Cut pieces C and D as you did for the first design and glue them onto the maple as in Figure 1b. You don't need an oak bottom because you still have a maple bottom. Let the glue dry.
First and Second Designs
Sand the body to round any sharp edges, make joints more precisely flush, and bring the wood to your desired level of smoothness. Get six zither pins plus one or two extra. Drill holes in a piece of scrap wood until you have determined what size drill gives you a hole a pin will fit tightly into. Drill six holes in the pin end of the lyre, corresponding to the black circles on Figure 2b. Tap the threaded ends of the zither pins into the holes, then screw them in.[3]
Third Design:
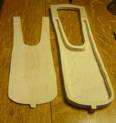
The body of the actual Sutton Hoo lyre was made in two pieces, not counting the sound board. One possible reason was to get the grain running crosswise in the peg end, so as to minimize the risk that a peg, pulled by the tension of the string, would act as a wedge to split the wood. Another possibility is that doing it that way made it easier to cut out the interior hole. My guess is that the maker was simply showing off his skill.
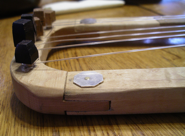
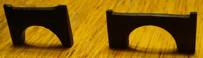
 The pictures below show the
unassembled pieces of the body, the assembled lyre, and two views of the peg
end. After assembly, the two pieces of the body are held together by rivets--brass
rods that run through a hole from a brass plate on the top of the lyre to a
brass washer on the bottom and fasten by peening over the washer.
The pictures below show the
unassembled pieces of the body, the assembled lyre, and two views of the peg
end. After assembly, the two pieces of the body are held together by rivets--brass
rods that run through a hole from a brass plate on the top of the lyre to a
brass washer on the bottom and fasten by peening over the washer.

All
designs:
 Drill a 3/8" one
inch deep hole in the center of the end of the lyre opposite to the pin end.
Glue into it a 1 1/2" long 3/8" dowel, with at least 1/2"
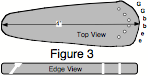
protruding, as shown in the picture below. Make a tail piece of 1/4" thick hardwood (you should
have some suitable oak left over) roughly similar to Figure 3. The 12 small
holes are 1/16” in diameter, the 2
large holes somewhat larger and slanted (see side view); their exact size
depends on what is going through them to hold the tail piece onto the peg at
the end of the lyre; I've used both rawhide and silver wire. Make a bridge roughly similar to
the ones shown in the pictures from 1/4" hardwood (or bone or amber if you
happen to have them). The bridge of the Trossingen lyre, shown below, was made
of willow.
Drill a 3/8" one
inch deep hole in the center of the end of the lyre opposite to the pin end.
Glue into it a 1 1/2" long 3/8" dowel, with at least 1/2"
protruding, as shown in the picture below. Make a tail piece of 1/4" thick hardwood (you should
have some suitable oak left over) roughly similar to Figure 3. The 12 small
holes are 1/16” in diameter, the 2
large holes somewhat larger and slanted (see side view); their exact size
depends on what is going through them to hold the tail piece onto the peg at
the end of the lyre; I've used both rawhide and silver wire. Make a bridge roughly similar to
the ones shown in the pictures from 1/4" hardwood (or bone or amber if you
happen to have them). The bridge of the Trossingen lyre, shown below, was made
of willow.
Wipe boiled linseed oil onto all of the wood, leave it five or ten minutes, wipe off, let dry. Wait at least four hours and repeat. Or use some other finish if you prefer.
Purchase the following nylon guitar strings (gut strings if you can get them): Two each G, b and e. Attach the strings to the tail piece running each in one hole, out the hole behind it, and tying, arranging the strings as shown in the tailpiece figure. Attach the tailpiece to the peg at the end of the lyre, using a short length of rawhide, a loop of silver wire,[4] or whatever else you have that will work. Attach the far end of each string to the corresponding peg at the peg end of the lyre, cutting the strings to length if necessary. Tighten the strings by turning the pegs (you will need to buy or make a key--a device that fits over the peg to turn it) until they are just barely taut. Insert the bridge (see Figure 1), locating it at about the middle of the soundbox. Continue to tighten the pegs, tuning them (low to high, left to right if the lyre is viewed from the string side with the peg end up) to b-flat-c-d-e-flat-f-g. This assumes a distance from bridge to tuning pin of 20"--for each 6% longer (shorter) you should lower (raise) the scale by one half step. Make sure the bridge is still vertical--tightening the strings tends to pull its top edge towards the pegs. Leave it a while. Retune (the strings will stretch). Repeat until it holds its tuning.
You now have a lyre.
The Trossingen
Lyre
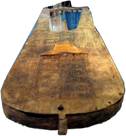
In 2002 an excavation of a Merovingian grave at Trossingen yielded the skeleton of a warrior holding a complete lyre--the only complete period lyre currently known to exist, two others having been destroyed during WWII. See below for pictures of the original instrument and my copy.[5]
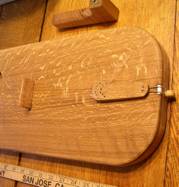
The Trossingen lyre is less square than the Sutton Hoo, with a slight waist. The body is a single piece. The soundboard is glued on instead of nailed, although there are several nails that appear to be later repairs. I prefer the design, in part on aesthetic grounds and in part because it is easier to make than an accurate copy of the rivetted Sutton Hoo design.
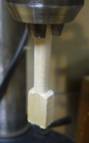
Several other details differ from the lyres described above. Instead of a peg at the bottom end[6] there is a protrusion of the body, as shown in the figures. There are two beechwood pegs running vertically through body and soundboard; the figures show their position.[7] The soundboard is of varying thickness, about 1/4" under the bridge, an eighth inch or less above and below that. The body is also of varying thickness, about 3/4" at the peg end tapering to 1/2" at the yoke. The soundboard fits into the body at the upper end rather than lying on top of it.
There are also three more striking differences:
The tuning pegs are upside down--the heads are under the lyre, the strings attached to the end protruding above the lyre. Four of the pegs are made of ash and appear designed to be turned with the fingers, two are hazel and appear designed for a tuning key. My guess is that one group or other are replacements; since I can get ash but not hazel and wanted to try the finger turned version, I used that for all my pegs.
The Trossingen, unlike any other lyre I have seen described, has sound holes--eight small holes in two horizontal rows of four, placed so that the bridge might fit between the two rows, as in my pictures below, plus two more holes located near the tips of the arms.
 The entire
surface of the instrument is elaborately carved (see picture[8]
below bottom left). This feature I have made no attempt to reproduce.
The entire
surface of the instrument is elaborately carved (see picture[8]
below bottom left). This feature I have made no attempt to reproduce.
 Aside from those
differences, the basic
construction is the same. You start with a ¾” thick plank, 32”
long by 8” wide; if you want to stick closely to the design of the original you
taper the plank towards the yoke end, using a saw, a router, a sander, a
chisel, or whatever else you think will work. Using a router you hollow it out as usual, leaving 1/8” thickness.
Cut out the body–I find it easier to do the router work first, since the
extra wood helps support the edge of the router–and cut a depression to
fit the end of the soundboard into (see pictures). Sand the surface the
soundboard will fit into flat.
Aside from those
differences, the basic
construction is the same. You start with a ¾” thick plank, 32”
long by 8” wide; if you want to stick closely to the design of the original you
taper the plank towards the yoke end, using a saw, a router, a sander, a
chisel, or whatever else you think will work. Using a router you hollow it out as usual, leaving 1/8” thickness.
Cut out the body–I find it easier to do the router work first, since the
extra wood helps support the edge of the router–and cut a depression to
fit the end of the soundboard into (see pictures). Sand the surface the
soundboard will fit into flat.
 To make the
soundboard, you start with a 1/4" plank about 26" long by 7 1/2"
wide. Working from one side--I used a router, then smoothed with a belt
sander--you take most of it down to 1/8", leaving a band about 4"
wide at 1/4" and tapering between that and the rest.[9]
You cut the sound board to shape, drill the sound holes, glue it to the body
with the flat side down for a better fit, the surface you have shaped up (I did
this wrong the first time, which made a good glue join much harder to achieve).
Sand everything smooth, finish the instrument with linseed oil, add tuning
pegs, tailpiece, and strings. For the pictured instrument I used a piece of
thick rawhide as the tailpiece, with a hole in one end fitting around the
protrusion at the bottom of the instrument.
To make the
soundboard, you start with a 1/4" plank about 26" long by 7 1/2"
wide. Working from one side--I used a router, then smoothed with a belt
sander--you take most of it down to 1/8", leaving a band about 4"
wide at 1/4" and tapering between that and the rest.[9]
You cut the sound board to shape, drill the sound holes, glue it to the body
with the flat side down for a better fit, the surface you have shaped up (I did
this wrong the first time, which made a good glue join much harder to achieve).
Sand everything smooth, finish the instrument with linseed oil, add tuning
pegs, tailpiece, and strings. For the pictured instrument I used a piece of
thick rawhide as the tailpiece, with a hole in one end fitting around the
protrusion at the bottom of the instrument.
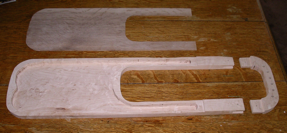
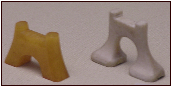
 The Trossingen
lyre is in several ways mildly assymetric; I do not know how much of that is
due to warping, how much to the constraints of the available material, how much
to working around the pattern of the carving, and how much to functional
reasons. Since only the last is relevant to how other lyres ought to be made, I
first built as exact a copy as I could (shown on the right), then redid the
design to make it more symmetrical and built a second and smaller instrument
based on that (pieces shown on the left). The cutting pattern below is the
symmetrical version; the size corresponds to the original instrument. If you
want to make a closer copy you should probably work from the Germania article, since it has more detailed information than
I give here.
The Trossingen
lyre is in several ways mildly assymetric; I do not know how much of that is
due to warping, how much to the constraints of the available material, how much
to working around the pattern of the carving, and how much to functional
reasons. Since only the last is relevant to how other lyres ought to be made, I
first built as exact a copy as I could (shown on the right), then redid the
design to make it more symmetrical and built a second and smaller instrument
based on that (pieces shown on the left). The cutting pattern below is the
symmetrical version; the size corresponds to the original instrument. If you
want to make a closer copy you should probably work from the Germania article, since it has more detailed information than
I give here.
Glue
The Trossingen lyre was held together with bone glue. Modern bone glue comes as lots of tiny amber spheres. Put some in a small jar, fill it with water to a little above the top of the spheres, leave overnight. Then heat it--the easiest way is to boil water in a small saucepan, take the pan off the burner and set the glue jar in it. As it heats it liquifies; if you think it is too thick you can add a little more water. You spread it on the lyre body where it needs to be glued to the soundboard and clamp. In my experience, you have to be careful to clamp it everywhere, in order to avoid having places where there is no glue join.
 One feature of bone glue is that it
softens when it gets hot. That could be a disadvantage if you leave your lyre
in a very hot car, although I haven’t so far had that problem. It’s an
advantage if you do something wrong and want to separate the glued pieces and
try again. Obviously, you can also glue the instrument with modern glues--but
when the kind of glue actually used is still readily available, I prefer to use
it.
One feature of bone glue is that it
softens when it gets hot. That could be a disadvantage if you leave your lyre
in a very hot car, although I haven’t so far had that problem. It’s an
advantage if you do something wrong and want to separate the glued pieces and
try again. Obviously, you can also glue the instrument with modern glues--but
when the kind of glue actually used is still readily available, I prefer to use
it.
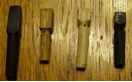
Pegs Some
of My Pegs
 On the finished lyre, the strings will run from a tailpiece
(described below) at one end to pegs at the other. You can, as descrbied
earlier, use metal zither tuning pegs. The real instruments used tapered
wooden tuning pegs fitting into tapered holes. After some unsuccessful attempts
to taper the pegs by hand and the holes with a plumber’s reamer, I went up on
the web and located a peg shaver designed for tapering tuning pegs and a
matching taper reamer designed for tapering the holes they fitted into. After
experimenting with making my own tuning key I went to using square socket keys
apparently intended for cabinet doors.
As you will see from the
pictures, I tried a variety of peg designs; the following description is what I
used until the long article on the Trossingen lyre, complete with details of
its pegs, became available.
On the finished lyre, the strings will run from a tailpiece
(described below) at one end to pegs at the other. You can, as descrbied
earlier, use metal zither tuning pegs. The real instruments used tapered
wooden tuning pegs fitting into tapered holes. After some unsuccessful attempts
to taper the pegs by hand and the holes with a plumber’s reamer, I went up on
the web and located a peg shaver designed for tapering tuning pegs and a
matching taper reamer designed for tapering the holes they fitted into. After
experimenting with making my own tuning key I went to using square socket keys
apparently intended for cabinet doors.
As you will see from the
pictures, I tried a variety of peg designs; the following description is what I
used until the long article on the Trossingen lyre, complete with details of
its pegs, became available.
To make squared headed pegs, I start by
cutting a piece of wood with a square cross section to fit the socket key (10
mm or 8 mm) and the length I want the peg to be--about 2”. I then clamp a piece
of scrap 2x4 to the table of my drill press, put a drill bit--the kind that has
a sharp point to center it precisely--in the chuck, and drill a hole in the
2x4. I then take the drill bit out of the chuck, turn it over, and put it in
the hole, point up. I then clamp my piece of wood in the chuck, centering it as
well as I can, and lower it onto the point of the drill bit, centering that at
the bottom of the piece of wood.
 The
drill bit is now functioning as an improvised vertical lathe. Use a round file
to turn a groove just below what will be the head of the tuning pin for the string
to wrap around. Below that, press a flat file on one side of the wood and a
piece of scrap wood balancing the pressure from the other, or a file on either
side, and turn the wood round; if you get bored using a file try coarse
sandpaper. You now have a tuning pin with a square head, a groove for the
string, and the rest round, as shown in the figure. Take the peg out of the
drill press and use the peg shaver to taper the round part. Drill a small hole
crosswise in the groove for the string to go through.Finally drill holes in the
lyre where you want the pegs to be and taper them with the reamer.
The
drill bit is now functioning as an improvised vertical lathe. Use a round file
to turn a groove just below what will be the head of the tuning pin for the string
to wrap around. Below that, press a flat file on one side of the wood and a
piece of scrap wood balancing the pressure from the other, or a file on either
side, and turn the wood round; if you get bored using a file try coarse
sandpaper. You now have a tuning pin with a square head, a groove for the
string, and the rest round, as shown in the figure. Take the peg out of the
drill press and use the peg shaver to taper the round part. Drill a small hole
crosswise in the groove for the string to go through.Finally drill holes in the
lyre where you want the pegs to be and taper them with the reamer.
Alternatively,
you could start with a piece of dowel and cut one end square to fit the key.
One advantage of the way I do it is that I can use varieties of wood not
readily available as dowels, such as the ash that some of the pins of the
Trossingen lyre were made of or ebony My
Ebony Bridges
if I want to make a particularly classy
instrument.
 When
you finally assemble the instrument, check that none of the pegs protrude
beyond the bottom; if they do, saw off the tip. Otherwise, when you are
pressing down on the peg end of the lyre in the process of tightening a string,
you may pop out a peg.
When
you finally assemble the instrument, check that none of the pegs protrude
beyond the bottom; if they do, saw off the tip. Otherwise, when you are
pressing down on the peg end of the lyre in the process of tightening a string,
you may pop out a peg.
The Trossingen pegs: To make pegs for the Trossingen lyre I
cut a piece of ash into pieces about 5/8"x5/8”x2 3/4” with the grain
running the long way. I then use a saw to reduce 1 3/4” of the length to a
cross section of about 5/16” and a sander to round that a little (see
pictures). I then insert the end of the piece in the chuck of my drill press
and use it as a vertical lathe to turn the reduced part, not counting what’s in
the chuck, down to about a 5/16” diameter dowel, as described above. I then cut
off the part of the wood that was in the chuck, use a saw and sander to shape
the head of the peg, use the peg shaver to taper the rest, cut a narrow slit in
the end for the string, flatten the end a little (because that’s how the real
ones were done--I don’t know why), and fit the peg to the hole it goes in. The
sequence of steps is shown below.
![]()
![]()
![]()
![]()
![]()
Wood for sound boards: 1/8" hardwood is hard to find. I managed to locate two sources online, one of which was willing to produce it inexpensively in sizes up to that required for a full sized lyre. If you are unable to locate such a source, there are several other possibilities.
Using a wide blade on my band saw, I can cut an 1/8" slice off a board with a width of up to about 6", which works for small lyres but not big ones. You should be able do the same thing with a hand saw and a wider board if you have a sufficiently steady hand with the saw, but I haven't tried. Or you might be able to find a lumberyard that was willing to split a board for you and had a big enough saw for the purpose. Alternatively, you can buy 1/4" hardwood and use a plane, router, and/or sander to take it down; this gives you the option of varying the thickness as in the Trossingen lyre.
A simpler and less expensive solution is to use 1/8" hardwood plywood, available at Home Depot (and I presume other places) in 4'x8' sheets for ten dollars or so. One sheet should make a lot of lyres. One problem is that the plywood tends to splinter when being sawed or drilled.
Sources
for Materials
Metal
Zither Tuning pins:
www.elderly.com
Square Keys: http://www.samstagsales.com/amf.htm
http://www.jwwinco.com/products/section16/din7417/index.html
Peg making tools:
http://www.internationalluthiers.com/tools.php
http://www.stewmac.com/shop/Tools.html
Bone glue: http://www.kremer-pigmente.de/englisch/chemic02.htm #glues&watercolorbinders Replica Lyre Bridges in the British Museum

This article will be among those webbed at: http://www.daviddfriedman.com/Medieval/Articles/ More_Articles.html real soon now.
David/Cariadoc Bridge
of the Trossigen Lyre
dfr@daviddfriedman.com