A Folding
Armchair
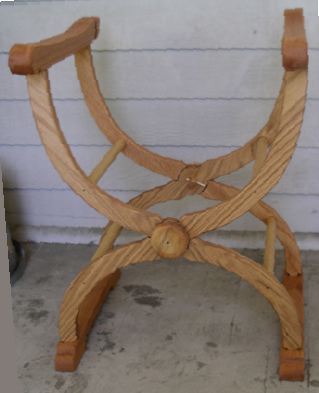
Some years back, Master Hal Raeburn made me a folding chair with arms.
It is a very comfortable design whose only fault is that it does not
fold very
flat and so is a bit of a nuisance to transport--at least when my wagon
is
packed and overflowing for Pennsic. The design goes back to at least
the
14th century; the 16th century version is
sometimes called
a "Dantesca" chair. This year I decided to make a scaled down version
for my
son. Since I am not as good a woodworker as Hal, I simplified the
design
somewhat. I also modified it in order to make it possible to take the
chair
apart.
General Considerations
I used oak, which is a strong wood and readily available; if you use
something weaker, such as pine, you may want to alter the design to use
thicker
pieces. The figures show the pieces at 100%--scaled for the chair I
use, not the
90% version I made my son. I am 5' 3 1/2" and my chair was made
specifically for
me; if you are substantially taller or shorter you may want to scale
the design
accordingly. The easiest way of making patterns is to copy the figures
from
this webbed article into a drawing program, scale as desired and print.
For
cutting curved pieces I used a band saw. If you don't have access to
one, use an
electric jig saw. If you don't have that, a hand jig saw should do it,
although
I expect it will take longer.
For blind
mortresses--the sockets in the chair arms and feet--I first drilled a
hole of
the appropriate size then used chisels to square it. For grooves I used
a table
saw; if you don't have access to one a hand saw, or a chisel, should
work.
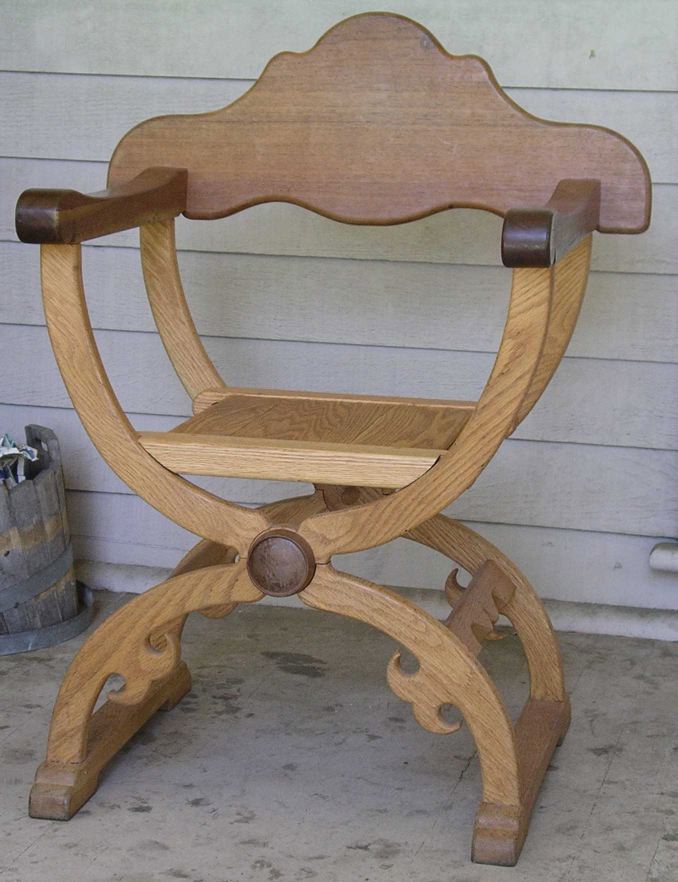
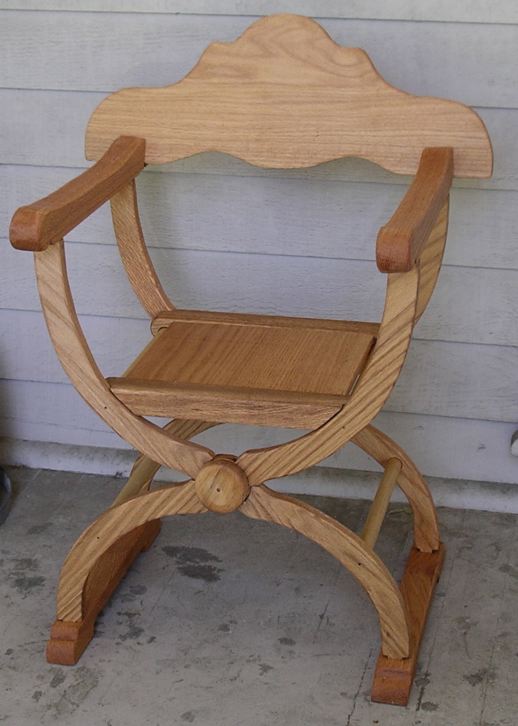
Making the Chair
On the left is the chair Hal made for me, on the right the chair I made
for my son. Figure 1 is a cutting pattern for one of the four S shaped
pieces
that make up the main structure. The pieces are identical except for
the holes
(A) drilled part way through them for the horizontal dowels to fit
into--on two
pieces they are on one side of the board, on two the other side.
The tricky
part of these shaped pieces is that the circle (B) in the center of
each is only
half the thickness of the board, in order that two can fit together as
shown on
the next page (bottom right).
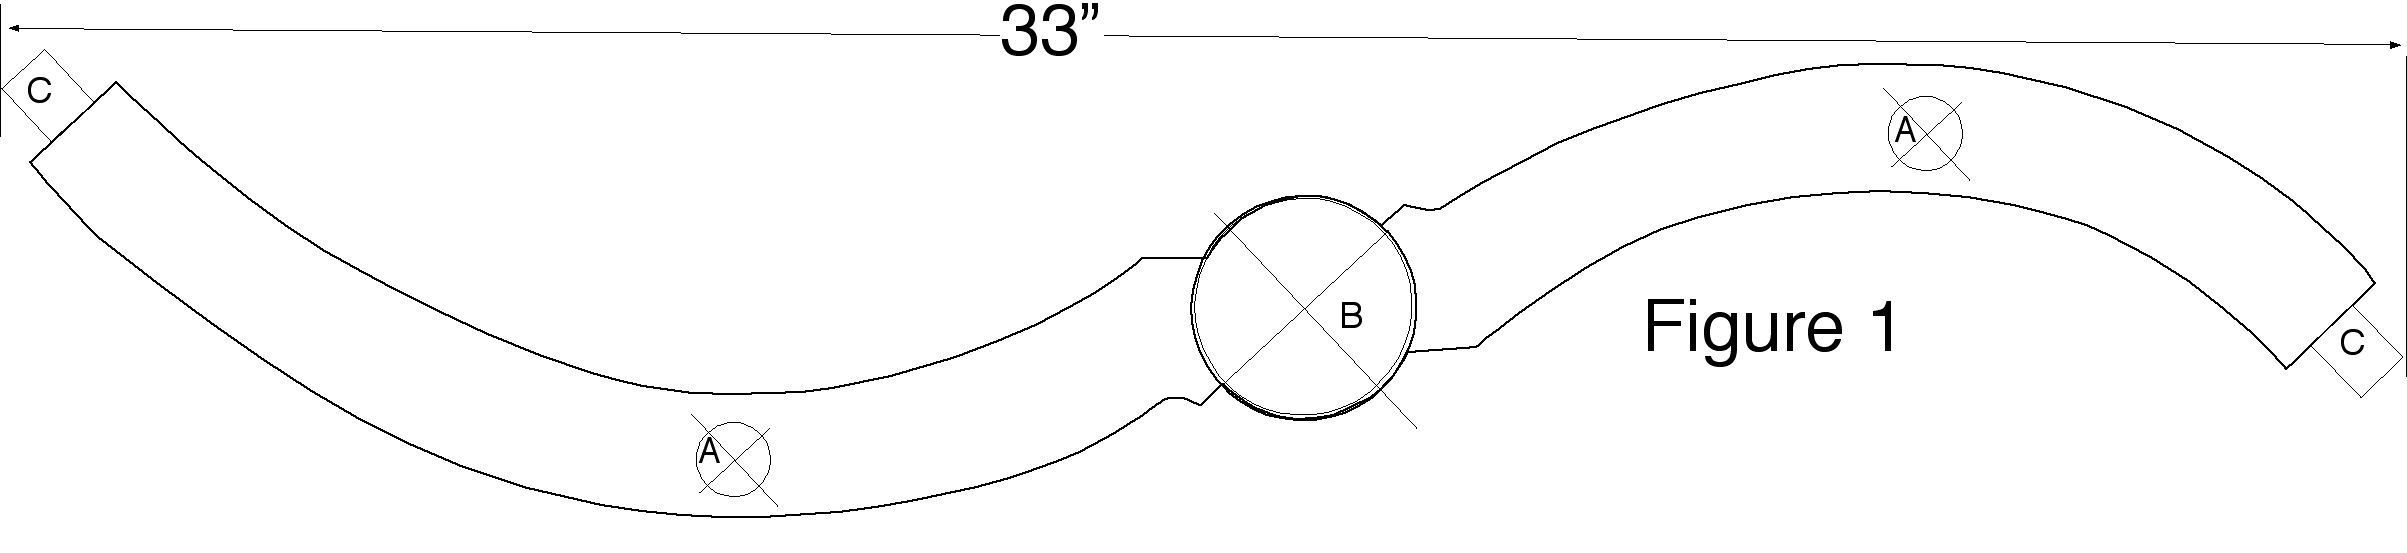
I found that the easiest way to make them was to first cut out the
piece,
then use an adjustable drill bit, set for the radius of B. The bit cuts
a
circular groove and also removes the wood inside the circle, although
not to the
full depth of the groove. Additional wood can be removed with a chisel.

Figure
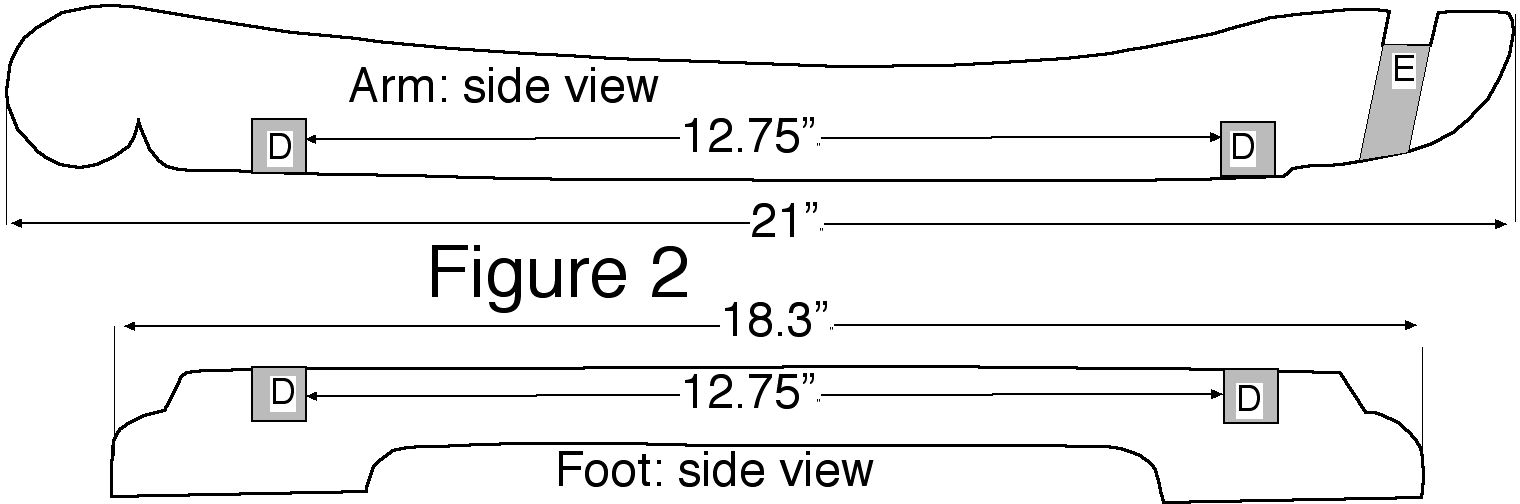
2 shows the arms and feet; thickness, the dimension not shown, is 2".
The shaded
squares (D) are blind mortresses--sockets that the tabs (C) on the end
of the S
pieces fit into. The shaded region E is a groove that the back slides
into. Its
exact width sshould be the same as the thickness of the back, either
1/2" or
3/4" depending on your relative preference for lightness or strength.
For
the chair I made my son, which was scaled to 90% of the full sized
chair whose
measurements are shown, I used 3/4" oak for the S shaped pieces. The
original
was 1" hardwood--which might be better for a full sized chair intended
to be
used by a reasonably heavy adult. You will also need four dowels. Their
length
should be the distance between the near sides of the sockets in arms
and legs,
since that is the separation of your two pairs of S pieces, plus twice
the depth
of hole A, into which they fit--from the separation of the sockets in
Figure 2,
that comes to 12 3/4"+3/4"=13 1/2", assuming the holes are 3/8" deep.
Diameter
should be the same as hole A--about 1" for the full sized version of
the chair.
Once you have cut all the pieces and made sure that the pairs of S
shaped
pieces fit together and that tabs C fit into sockets D, the next step
is to
drill a hole at the center of
each
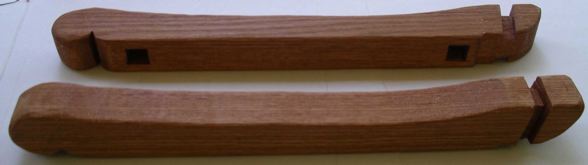
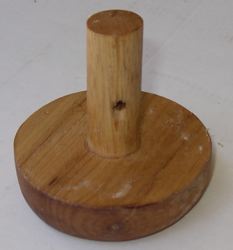
circle B. To make the two pivot pieces that go through those holes, cut
two 2
3/4" lengths of 7/8" hardwood dowel and two circles of 3/4" hardwood
the same
size as circle B. Drill a 7/8" hole part way through the center of each
circle
and glue the dowel into it, giving the mushroom shaped piece shown to
the
left.
Assemble two S pieces and one pivot piece as shown below. Repeat for
the other pair of S pieces. Make sure to assemble the legs so that all
the holes
A, drilled part way through, face inwards and both pivot pieces face
outwards.
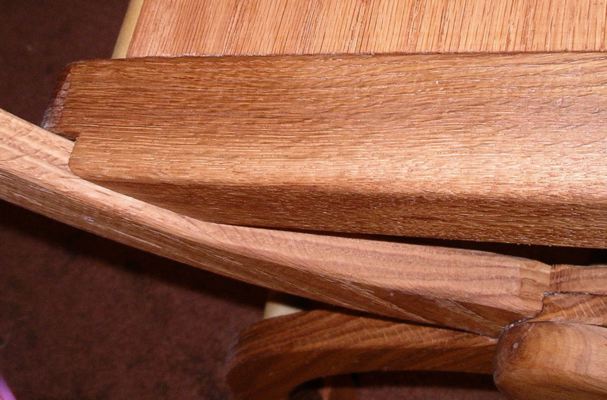
Assemble the whole thing, with tabs in slots and dowels in holes A.
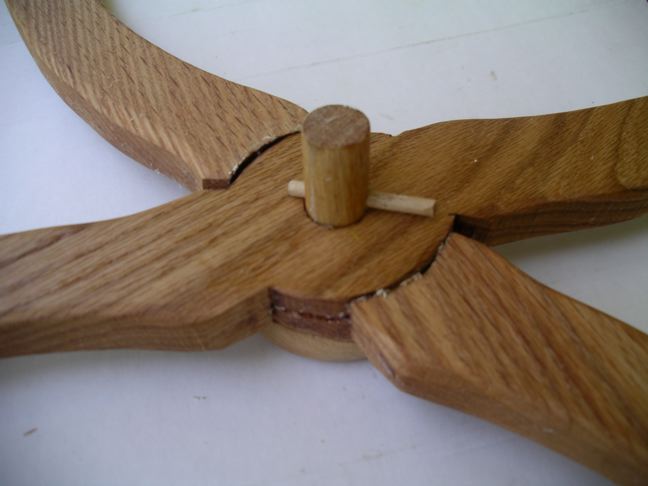
To
keep the pivot from coming out, drill a hole through the pivot dowel on
the
inside side of the S pieces and put a small dowel through it, as shown
above.
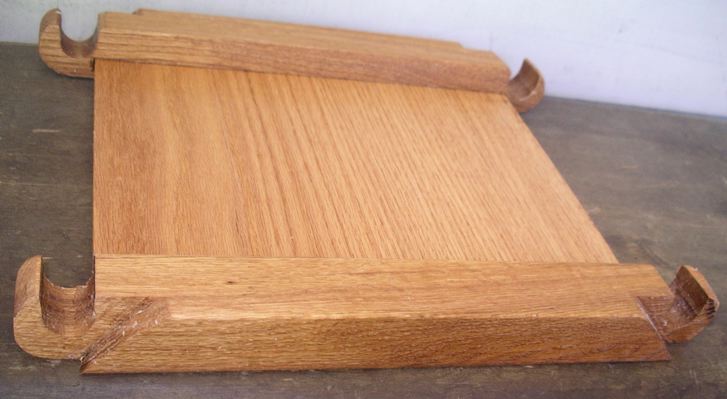
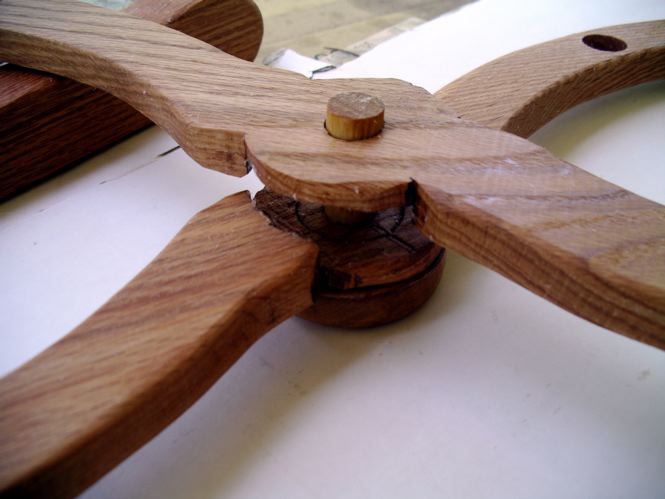
The picture below shows how it now looks--a chair minus back and seat.
Figure
3
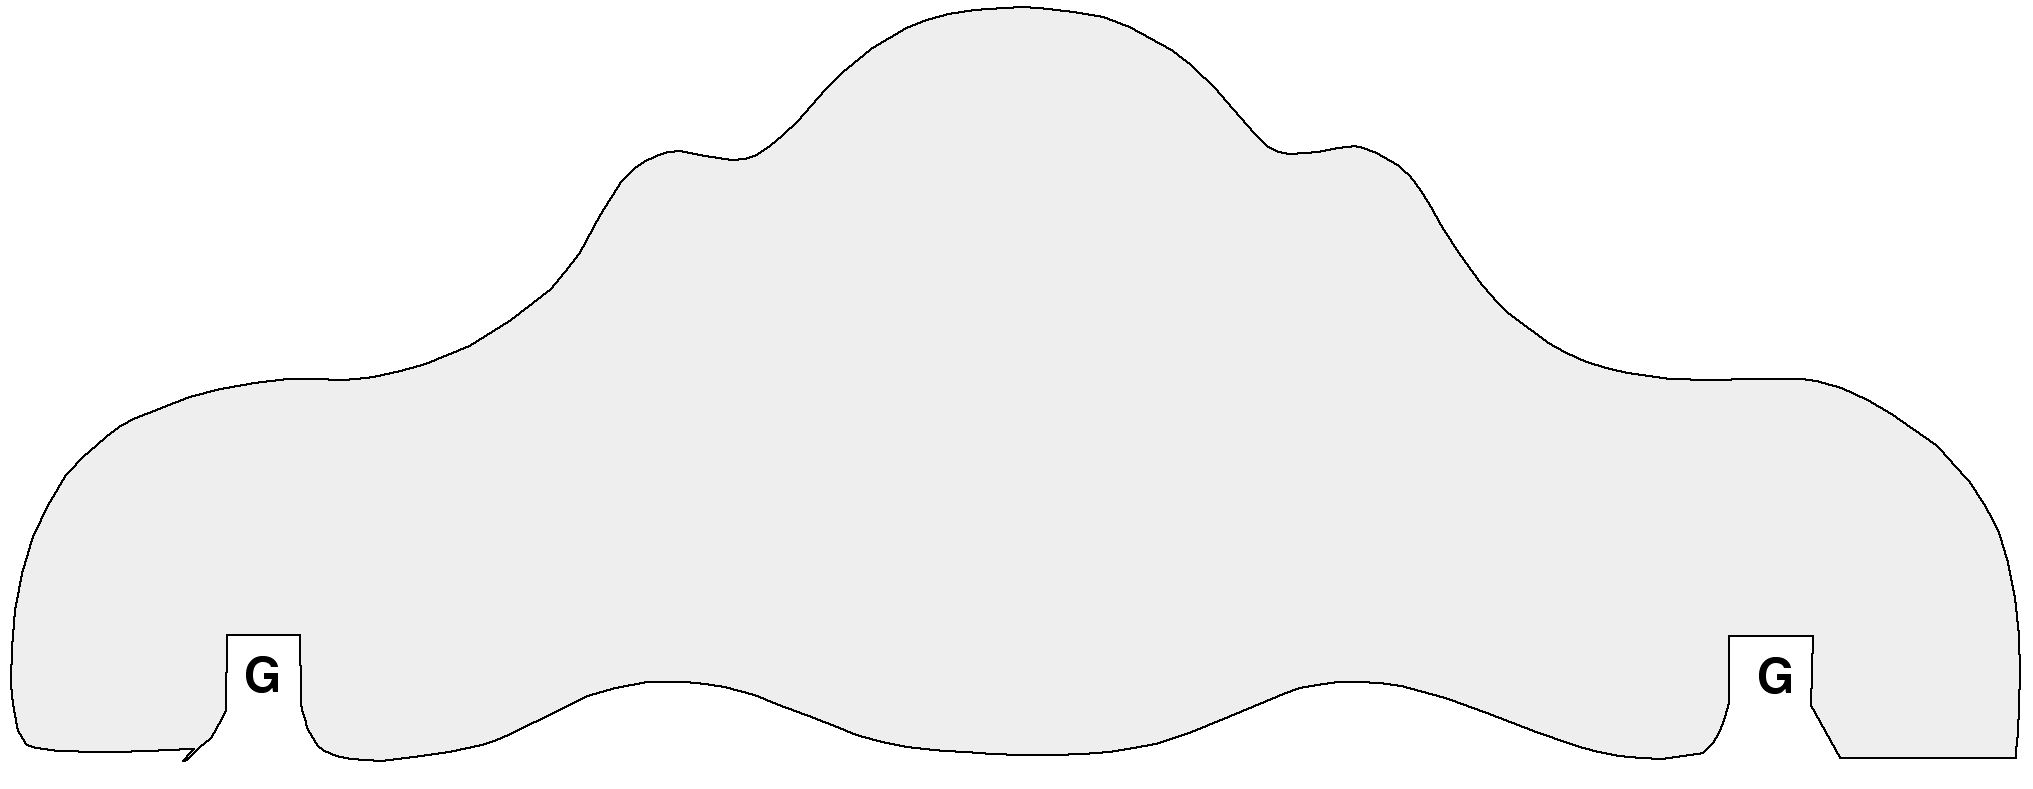
Figure
3 is an approximate cutting diagram for the back--its aesthetic
excellence
should be credited to Hal, whose design I copied. Use either 1/2" or
3/4" wood.
Scale, or otherwise modify, the figure so the slots (G) are the right
distance
apart, and the right width, to fit into the grooves in the arms. This
is best
done after you have the rest of the chair assembled, since the exact
separation
of the arms depends on the exact angle at which the S shaped pieces
cross, which
in turn depends on fine details of the
pieces.

Figure 4
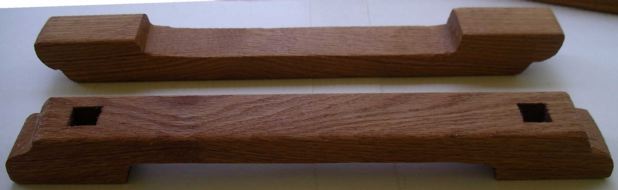
Seat
The seat consists of two support pieces of oak about 2"x1 3/4"x 16
1/4" and
one piece about 12 3/4" x 12 1/2" x 1/2" that makes the seat itself;
figure 4
shows a side view of one of the supports. The 1/2" piece goes into
grooves cut
into the inside surface of the supports--the surface away from the
adjacent S
piece. Exact dimensions should be calculated, like the exact form of
the back,
after the rest of the chair is done and you can measure the separation
of the
two upper dowels. The pictures below show a top and bottom view of the
assembled seat.

For my chair, I made the grooves 3/8" wide and 1/2" deep, then
planed half
an inch on each side of the seat down to 3/8" to fit, but if that is
too much
trouble you could use 1/2" wide grooves instead. The outside surface of
the
thick pieces is inset at the end--shaded area F--so that the edge of
the
assembled seat can fit partly over the adjacent S piece, as shown
below.
Disassembly
The chair, minus back and seat, consists of two closed loops of
wood--front S piece to foot to back S piece to arm to front S piece
again. In
Hal's version, one of the S pairs crosses right over left, the other
left over
right, with the result that one of the two loops is just inside the
other. This
prevents the loops from moving forward or back with regard to each
other,
supplementing the effect of the cross pins on the pivot pieces. It also
means
that the two loops can, in principle, be separated without taking
either apart.
In practice, however, the chair is sufficiently rigid so that it would
be
difficult to separate the crossing pieces far enough to make that
possible.
One way to make the chair more transportable is to never glue on the
arms,
legs, and dowels, relying instead on the tabs being tight enough in the
sockets
to hold the piece together. That is what I did on the 90% version I
made for my
son; since I am writing this after making it but before using it at
Pennsic, I
don't yet know whether there will be any problem with spontaneous
disassembly.
If so, I have glue in my toolbox.
For an earlier and smaller version of the
chair I used a different system. The paired S pieces cross the same
way, which
means that the two loops are interlocked but, once the pivots are
removed, not
held together. I left one foot and the corresponding pair of dowels
unglued;
removing them lets me separate the two loops, which nest together much
better
separately than together.
Final Comments
Once everything is made, sand or file round any sharp edges or corners
that you don't want sharp, assemble it, glue on feet, arms, and dowels
(or not,
depending on whether you want to be able to disassemble it later). I
finish my
furniture by wiping on boiled linseed oil, leaving it fifteen minutes
or so,
wiping it off, and repeating four or more hours later, then letting the
whole
thing dry for a few days. The result on oak looks beautiful and
provides some
protection, although perhaps less than with more modern finishes.
Linseed oil is
a period material; I have been told that it was used for finishing
furniture in
period but have not actually seen the evidence. I have also been told
that a
linseed oil finish works better if you use oil heated to 135° F,
but have
not yet tried doing it that
way.
Cariadoc
http://www.daviddfriedman.com/Medieval/Medieval.html